Perspectives of a Writer and Musician

Issues related to writing, publishing and playing jazz music: One man's muse.
by Al Stevens

My Photo
Name:
Location: Florida, United States

Friday, June 30, 2006

A Newer Look

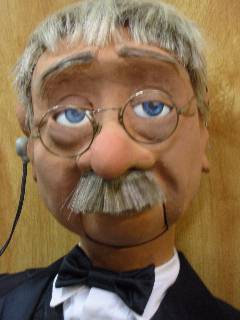
Thanks for all the opinions about Uncle Sweeter's mustache. Eleven interested parties say lose the mustache. Eleven say keep it. So we are split down the middle. Two prominent figure makers offered opinions. One was for the mustache, one against it.

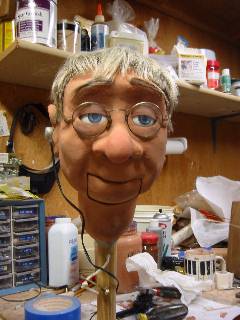
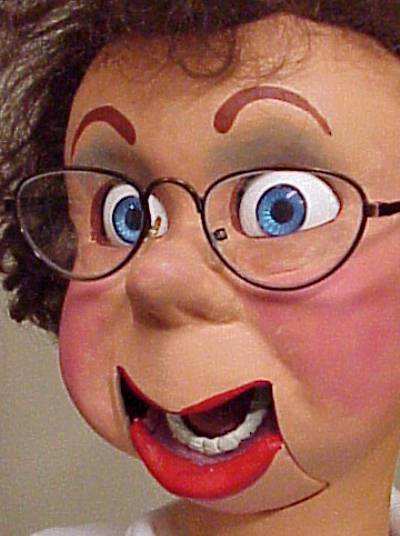
This is an interesting survey. Those who like the mustache generally say only that he looks better with it and that it adds character. Those who prefer him without a mustache offer specific details. With a mustache he loses his individuality. He looks older without it (something I had observed myself). His face has a lot of character and the mustache steals focus from and detracts from the face. He looks like two different characters with and without the mustache; more grandfatherly without and more of a smart alec with.

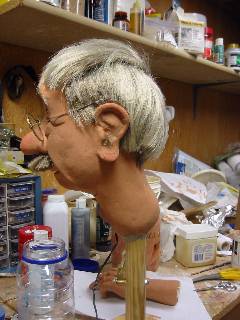
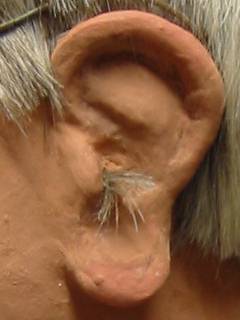
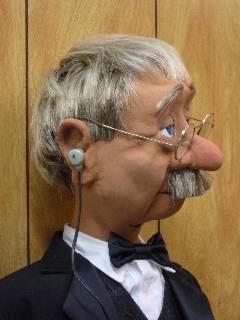
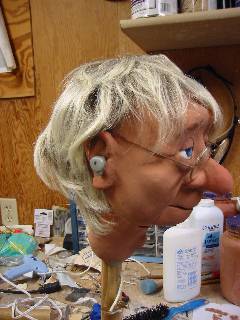
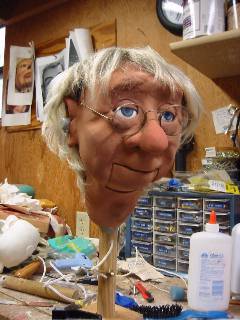
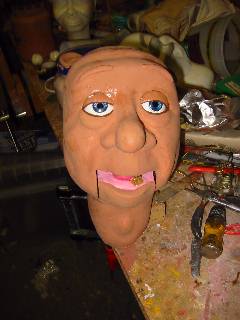
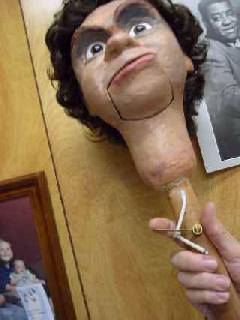
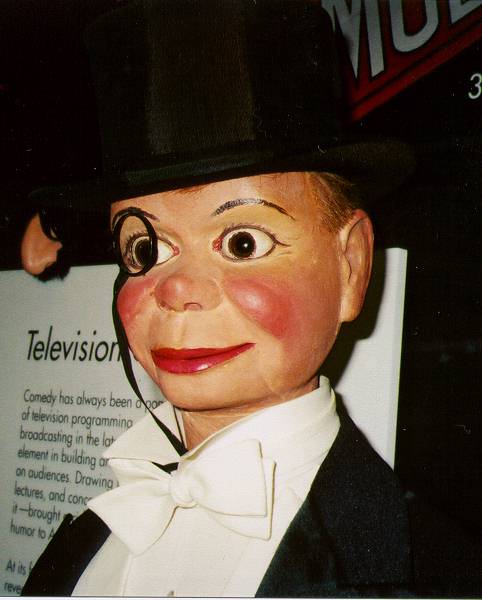
I must admit that I was biased toward keeping the mustache, probably because I had time invested in making it. But I was convinced by my wife Judy to remove it, at least temporarily. She said that Pop didn't have a mustache, he had nose hair, and he almost always needed a shave. While I was at it, I made his nose a bit redder. So, here is yet another version of what Uncle Sweeter Dabney can look like.


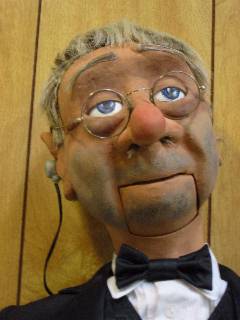
By the way, the tuxedo is temporary. He'll be wearing clothes more appropriate to his character when I complete his body. But he wants to keep the tux for when he goes in for his vascectomy. "The doc said after the operation I'd be impotent. I want to dress the part."

Thursday, June 29, 2006

The Great Mustache Debate

Several folks have weighed in with their opinions about Uncle Sweeter's mustache. The votes so far are three in favor of keeping it, two who say lose it, and one undecided. I need more opinions.

Please vote by using the Comment feature of this blog, by posting to one of the ventriloquist lists, or by private email.

Here are some before and after pictures. Someone suggested that I trim the mustache to explose more upper lip. I took that advice.

Before

Without a mustache, Uncle Sweeter reminds me somewhat of actor Ed Wynn.


After

With his mustache, Uncle Sweeter looks to me like his name should be Hoopnagle and he should speak with a Scandinavian accent, by Yimminy.


I understand that these pictures might be somewhat obscured by the disarray in the background of my workshop. Sorry. That's how I work. My method is to wade through a project putting things down wherever I happen to be when I'm done with them and pushing things off to the side when I need space to work on the bench. Maybe I'll straighten up the workshop when I complete the project; maybe not. (My office looks about the same.) If I took the time to straighten up everytime I do a procedure or want to take a pretty picture, I'd be at this until the end of next year.

Hairy Ears

I mentioned earlier that Uncle Sweeter is inspired in part by my father-in-law. Pop lived with us for the last few years of his life.

Pop was a humorous man. Like most such men, he got funnier as he got older, and much of Uncle Sweeter's humor is taken from things Pop said. I often thought about Pop as I worked on this project.

Yesterday, while I was touching up the wig around Uncle Sweeter's ear, I recalled several times when I trimmed Pop's ear hair and the conversations we'd have during those times. That recollection led to this:


Here's the real deal from his last Christmas in 2004.

Wednesday, June 28, 2006

Shoulders?

Uncle Sweeter's body is not a standard vent figure's body. He is stoop-shouldered. Seeing him on a conventional body reinforces the need for something differnt. Consequently, his shoulder piece must be more than just the typical oval piece of board with a neck hole. I'll sculpt it from clay, make a plaster mold, and cast it in fiberglass. The procedure is similar to how I built the head.

  1. Draw the shape on a board and build a fence of clay that defines the outer perimeter of the shoulderpiece.


  2. Fill the fence with aluminum foil and form it to the shape of the shoulder piece.


  3. Using the foil as an armature, sculpt the shoulder piece in clay.


    Here's a picture from the side. The body front is toward the left in this picture. You can see that the neck hole is forward of the piece and sloped downward, and the rear part of the piece forms Uncle Sweeter's stooped shoulders.


  4. Put the model in the mold cabinet, seal the seams, grease it up with petroleum jelly for a mold release, and prepare to make a plaster mold.


After this, the procedure is exactly like making the cast for either half of the head.

Opinions Needed on a Mustache

I was looking at the box of waste wig hair from the haircut and had a thought. How about a mustache. By layering the locks of hair, I made a mustache that matches Uncle Sweeter's head of hair. Here's how it looks.


But I'm just not sure. Many of you have followed this project from the beginning. You've seen Uncle Sweeter clean-shaven. What do you think? Should he keep the mustache?

Every time I think of a new feature, it adds time to the project. This mustache took all morning. Yesterday, I sculpted a wedding band on his left hand. Now, I'm thinking he should have a tattoo on the back of one hand. A military emblem. I may never get this guy finished. I'm glad I'm not paying me by the hour.

Tuesday, June 27, 2006

"I Ain't Got Nobody"

While Uncle Sweeter waits for his own body parts to be built, he can use this Hartz body and its formal attire. He looks kind of dignified, doesn't he?

Call the Exorcist!


I think I'd better go to bed.

Tomorrow I'll finish the other hand and begin work on the body.

Here he is with a haircut, eyebrows, and a cable for his hearing aid.

Here he is in profile.

And here's a closeup of his hearing aid. There will be a cable going to the unit on his belt.

Heads Up

The detail paint is finished, the hearing aid is installed, and I've selected a wig. He needs a haircut, and some eyebrows, whereupon Uncle Sweeter's head is completed.


I've reluctantly abandoned the combover idea. Looking at the wigs in my collection, I can't see a way to modify one to get the effect I want. I like the idea that he still has most of his hair, and the silver-gray wig from the wig box seems to fit his character. Now he can wear a hat, Mortimer style. With a combover, I'd have to leave him bareheaded so everyone could see the combover. We'll see how he looks after the haircut.

One of these days I'm going to clean up that workshop, too.

Monday, June 26, 2006

Getting Ahead

The ears and headstick are installed. All that's left for the head are paint highlights, eyebrows, and a wig. Gee, is that all?

The Haunted Workshop

This greeted me when I entered the shop this morning.


I think it's time for a long rest.

Sunday, June 25, 2006

Hands Down

I'm working on hands today. I finished the right hand. The left is sculpted and setting up so I can add details.


There's no problem finding an old man's hand to use as a model. No problem at all.

Saturday, June 24, 2006

Four years from today, this guy will be 70. It isn't fair.


I think I'll take the rest of the day off.

Friday, June 23, 2006

Progress in Process

I made much progress yesterday. I started building hands, installed the eyes and jaw, and added a feature to an ear.

Hands

Why build hands when there are stock hands readily available? These are for Uncle Sweeter. His hands aren't stock. He has elderly rawboned hands with all the care-worn features of an old man who was a laborer all his life.

Here are pictures of the hand progress so far. First I made wire frame armatures.


Next, I fleshed one of the armatures with aluminum foil and masking tape.


Then, I sculpted layer one over the armature with MagicSculp.


There's more to be done—sanding, filling, feature sculpting. Then I have to do the other hand.

Making Headway

Uncle Sweeter's eyelids, eyes, and jaw are now installed. He's starting to take on character. This is the point when you start talking to your figure, the point when people walk into the workshop and reinforce their notion that we're all nuts.


Ear Adornment

I was looking at Uncle Sweeter's ears yesterday and thinking how boring they are. Then it hit me. A guy his age would have a hearing aid, probably an old fashioned one like the one my Uncle Harry wore when I was a boy. It had a prominent button receiver that fit in his ear and a wire that went down to a unit strapped to his belt. Old people were always tapping that unit when they didn't hear something. I always thought it funny when I'd see a flesh-toned receiver. As if that big button stuck in your ear would be imperceptible. I went online and found pictures of antique hearing aids. I sculpted the receiver from MagicSculp. Here it is unpainted.

Thursday, June 22, 2006

Headsticks and Levers

I've built a lot of headsticks in a lot of different ways. The stick itself has to be something cylindrical. Traditionally it is made from a hardwood 1.25" dowel. Sometimes I use 1.25" PVC pipe. Either one works well, but I prefer a wooden stick. It just has a good feel to it.

Levers are another thing. I've carved them from wood, made them from toothbrush handles, used clothespin halves, and cut them out of sheet brass stock.

Another choice is how the levers attach to the headstick. They can be connected to the outside of the stick or embedded in slots cut into the side of the headstick.

And then there are the control mechanisms. They can be implemented with strings or rods.

Figure makers take pride in their headsticks. The slicker and cleaner the design, the more attractive they are to buyers, or so it would seem from the promotional literature. "All brass mechanics. No strings to break."

Yet old fashioned string-and-lever controls hold up after years of use. The following pictures are of headsticks I made over the years, some with strings, some without. Uncle Sweeter has only one mechanism, a moving jaw, so his headstick will look much like those in the last two pictures shown here. Wooden stick, brass lever mounted on the front of the stick, nylon cord control. I expect it to outlive me.


Wednesday, June 21, 2006

Primed and Ready to Assemble

Everything fits, head-wise. I've primed all the parts. I give the primer a couple of days to fully bond with the fiberglass. Then I can start assembling the head. Until then, there's a headstick, a body and some hands to make.

Tuesday, June 20, 2006

Small Tasks, Big Issues

Today is busy, but there's not much to report in the way of progress. I'm doing a lot of sanding and fitting. The jaw fits and operates well now. There are, however, some issues to consider before I start assembling and painting.

The Complexion: Smooth or Rough?

Old men have rough complexions. Wrinkles, blemishes, pits, bumps, and so on. It would be easy to keep the natural roughness that results from a clay model, a plaster mold, and a fiberglass cast. I've seen many ventriloquist dummies with really bad complexions, and many of them aren't elderly characters. A stroll through Vent Haven shows what I mean. And some contemporary figure makers produce rough-looking dummies even today. The philosophy is, I suppose, why expend a lot of time perfecting what is, after all, only a puppet.

I built Aunt Sally in only a few days because I needed her for a performance. I took a lot of short cuts to meet the schedule. As a consequence, Aunt Sally was rough. The performance was onstage at a concert in a dark concert hall, and no one noticed. But I noticed. I'm the guy who has to stand next to her. So, the following week, I tore her down and gave her a facelift. Nobody else noticed, but it is important to me.

Here are before and after pictures. Click them to see the differences.


Look at some of the figures made by many prominent figures makers of yore. They are rough. They are cartoonish in appearance with rough surfaces and garish paint schemes. Then look at the original Charlie McCarthy in the Smithsonian. You can get up close to Charlie and take a good look. He is virtually flawless.

Get up close to Danny O'Day, which you can do at the annual convention. He is a work of art, well designed, well built and well maintained. Examine any Selberg figure in the dealers' rooms. Flawless. That's what the rest of us strive for.

When To Do What

Making a figure is an engineering project. Things have to be done in their proper order. After making several figures you learn what ought to be done when. For example, don't install the eyes until you've painted around the eye holes. Don't install jaw until you've painted the tongue and teeth. Don't assemble the head with an unreachable and unfinished component way down in there someplace. I can't tell you how many times I've spent a day with needle nose pliers trying to loop the end of a spring onto a screw eye that I can't reach. Or a string through a pulley. Or how many times I've tried to thread a screw eye into a place way down in the neck because I forgot to install it when I could reach where it needs to be.

But some things defy careful planning. Uncle Sweeter's jaw is, of course on the front of his head. The place where the other end of the jaw spring attaches is on the back inside of his head. Installing a jaw spring involves trying various lengths until the tension is just right. The two halves need to be permanently attached to do that. With the two halves together it's difficult to reach the place where the spring attaches. And on and on.

Custom and Production Line Dummies

When you build custom dummies, you run into the issues discussed above and many others. But when your business is building and selling dummies from a product line of characters, it is foolish to make every project unique. You need to minimize the time you put into each dummy if you want to earn more than minimum wage. Which means you need a production line approach to building.

Look at Lovik dummies, particularly the ones Craig Lovik built toward the end of his career. They are nice figures, indeed, but they are characterized by a need to streamline production and minimize costs. The faces have smooth features with no undercuts. This approach makes molding and casting much easier. The jaws have wide slots. This approach minimizes the time needed to fit a jaw into a face. In fact, I've never seen a cast Lovik head that had a well-fitted jaw. One of the features that surprised me had to do with the size of the dummy. I forget the details, but for extra money, you got a larger dummy. Maybe 42 inches instead of 38. Based on two figures I had in my shop, the only difference was that the stuffed legs were longer on the larger dummies. Everything else was the same.

Uncle Sweeter is a one-of-a-kind figure, which is all I make these days. I will take the time to make everything as perfect as I can. I'm in no hurry. In fact, if I was under pressure to complete him by a deadline, I wouldn't spending all this time taking pictures and posting project status on this blog.

But that would take all the fun out of it.

Monday, June 19, 2006

Fitting the Jaw

Fitting a jaw to a face is a tedious task. You do the best you can when sculpting to ensure that the jaw fits and opens and closes cleanly and smoothly, but it's never right. The procedure starts after the axle is in place and involves cutting and filling on both the jaw and the jaw hole in the face until the jaw works properly. It's an interative process until everything is right. It's even more tedious when you want a perfect jaw fit.

Here's Uncle Sweeter's jaw during the procedure. You can see the MagicSculp that builds up the jaw at the bottom. This step takes a lot of time because everytime you add filler, you must wait for the filler to set up before you proceed.


While I'm waiting I can install the pulley that the jaw string goes through. The pulley is on an axle mounted in the back of the neck. It's slightly off center when aligned with the screw eye in the jaw because the string, being threaded through the screw eye, comes to the pulley from one side of the screw eye, and I use heavy duty nylon cord for control strings.


The string will angle down and forward to come out the front of the head stick. This configuration allows me to install the jaw lever on the front of the headstick or on either side. We'll get to that step much later. In the meantime, I'll be spending a lot of time getting the jaw to fit. Most of that time is spent waiting, so there are other tasks to undertake. The body, the hands, the arms and legs, the costume, and so on. There are always things to do.

Jaws II

While the axle shelves are setting up in the face, I'll add some needed pieces to the jaw. It needs a place to connect the jaw movement string and a place to connect the spring that holds the jaw closed. Both connections are screw eyes. The string connection is on the back of the jaw in the center at the lowest point. When the string pulls backward, the jaw opens. The spring connection is on an extension from the back of the jaw. When the spring pulls down, the jaw closes.


When I was thinking about teeth, someone suggested one gold tooth for Uncle Sweeter. I like that idea, and so it shall be. You can almost see it over on the left in the next picture. The gold tooth will be more visible when I paint the inside of the mouth.

I also added something that I remember from when Pop, my father-in-law, had only one tooth remaining. He held his tongue in a certain way. So, Uncle Sweeter's tongue is held that same way.

Installing the Jaw

The other day I cut out the jaw from the cast face. Now it's time to turn it into an opening and closing jaw. First, I must build what Winch calls in his book on ventriloquism, the "casket," which is simply an internal structure that provides a palate to support his tongue and an axle on which the jaw pivots.


The casket's axle has to be positioned at the center of an imaginary circle of which the arcs defined by the horizontal slots when viewed from the side are a part. Got that? If it's confusing, here's an article titled Building a Precision Mouth Movement that should explain it.

After you've done it a few times, you can position the axle by eye.

With the jaw and its axle assembled, I put the jaw back in the face flush with the cheeks in its normally-closed position. Then, with MagicSculp, I build two small shelves on either side of the inside of the face. The shelves have depressions into which the axle lowers so I can insert and remove the jaw while I tune up its movement. Later, when the jaw is working smoothly and precisely, I'll install the jaw permanently.