Mold, er, Mould, er Whatever
First, according to my dictionary, mold and mould are both correct spellings. I'll use the one that is easier to type.
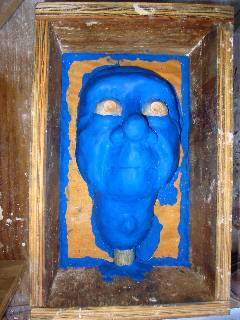
To make a plaster mold, I built a mold cabinet specifically for dummy heads. Here is Uncle Sweeter's head laid to rest in the cabinet.

What appears to be the cabinet floor is really a subfloor half-way down the cabinet. The subfloor has an aperture which is the shape of an earless dummy head. The head slides into the aperture so only the face half of the head is exposed.
The first molding process makes a mold of the front half of the head. When everything is ready, I'll pour plaster into the cabinet up to the brim. But not yet.
Not all heads are exactly the same dimensions, and the subfloor itself has a little wiggle room in the cabinet. Therefore, I need to seal the spaces so that liquid plaster does not run down into the lower half of the cabinet. I use clay to do that as shown next. You don't have to do this wrong many times to realize that this step is important and takes patience.

We're not quite ready to pour the mold, though. There needs to be a mold release so the plaster does not adhere to the clay, the wooden eyeballs, or the sides of the cabinet. That comes tomorrow. Molding is a tricky process and one that ought not be done when you're tired and the light isn't good.
To make a plaster mold, I built a mold cabinet specifically for dummy heads. Here is Uncle Sweeter's head laid to rest in the cabinet.

What appears to be the cabinet floor is really a subfloor half-way down the cabinet. The subfloor has an aperture which is the shape of an earless dummy head. The head slides into the aperture so only the face half of the head is exposed.
The first molding process makes a mold of the front half of the head. When everything is ready, I'll pour plaster into the cabinet up to the brim. But not yet.
Not all heads are exactly the same dimensions, and the subfloor itself has a little wiggle room in the cabinet. Therefore, I need to seal the spaces so that liquid plaster does not run down into the lower half of the cabinet. I use clay to do that as shown next. You don't have to do this wrong many times to realize that this step is important and takes patience.

We're not quite ready to pour the mold, though. There needs to be a mold release so the plaster does not adhere to the clay, the wooden eyeballs, or the sides of the cabinet. That comes tomorrow. Molding is a tricky process and one that ought not be done when you're tired and the light isn't good.


2 Comments:
I should add that I need to seal under and around the headstick pole with clay. Otherwise the plaster will form around it, and I won't be able to get the clay model and aperture out of the cast. That's another mistake that you make only once.
I should add also that the concern about the headstick is not common. Most headsticks are mounted vertically in line with the head. In this case, because of Uncle Sweeter's stooped shoulder look, the headstick angles forward and part of it is actually above the mold cabinet's subfloor.
Post a Comment
Subscribe to Post Comments [Atom]
<< Home