


Recording Audio Demo Clips
Ventriloquists can add sound clips to their promotional web sites featuring a dialog with their figure. This article explains how to record a one-minute sound file on your computer without spending a lot of money or needing a lot of technical know-how.
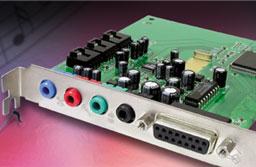
When the sound card is installed the small receptacles, called jacks, are exposed at the back of the PC. One jack is where your speaker cable or headphones are plugged into the sound card. Another jack is for the microphone. The other two jacks are for connecting line level inputs and outputs. We won't need them for this job.
You might have to look closely at the jacks to see how they are labeled. If you have documentation for the sound card, it should tell you which jacks are for which circuits. Some cards have the jacks color coded to match the plugs on an integrated system.
Laptop PCs have internal sound circuits with similar jacks. This procedure works as well with a laptop PC.
correct cable plug to fit the sound card's microphone input jack.
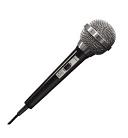
It is best, although not absolutely essential, to use a microphone with an on/off switch like the one shown here.
The more you spend for a microphone, the better your audio sounds. But this recording is of your voice only. The human voice does not have the frequency and dynamic ranges of musical instruments. Therefore, you don't need studio-quality equipment to make a good-sounding recording of a spoken message.
Do not, however, use one of those small PC microphones intended for web communications. Many PCs include one in their audio bundles. Those microphones are for talking to other people on the Internet. They support telephone quality communications only and do not have the dynamic range needed for good spoken audio recordings.
Make sure your microphone has the 1/8" mono plug that fits the sound card's microphone input jack. If it has a 1/4" phone jack instead, you can buy a plug adaptor at Radio Shack.
The next piece of equipment can make the difference between a good sounding audio recording and a poor one. When you speak into a microphone from a close position, the plosive B and P labial sounds (yours not your figure's, assuming you use labial substitutions) make a popping sound when the burst of air produced by the labial hits the microphone.
A pop screen device suppresses those noises. You place the screen between your mouth and the microphone and the screen filters the burst of air that the labials produce There are expensive professional studio pop screens as shown here.
Make your own pop screen with a wire coat hangar and an old nylon stocking. Make a round frame from the coat hangar. Rig it with a stand to mount or place on a table in front of the microphone. Stretch two layers of stocking tightly over the frame, one on each side, and stitch or glue the stocking pieces in place. That's all there is to a homemade pop screen, and it's as good as the expensive professional ones.
The ideal sound studio is sound proof, which means outside noise can't get in. Sound proofing your bedroom or study might not be practical. Since this is a one-time project, plan to record when background noise is at a minimum. Unless you live in a city, nighttime is the quietest time. If you live near a railroad, learn when the trains go by. If you live next to an interstate or in the departure path at an airport, it's best to take your equipment somewhere else unless you can pick a day when the traffic is at a minimum. (Airplanes take off into the wind, so pick a day when you are downwind of the airport, that is, when the wind is blowing toward your house from the direction of the airport.) Choose a day when it is not raining. Rain on the roof makes a lot of noise.
The ideal sound studio has an irregular room shape, which means that sound doesn't bounce off the walls and ceiling at right angles. The idea is to eliminate natural reverberation, which can compromise the quality of sound. The room should not have a lot of exposed glass surfaces such as sliding glass doors. Lots of books in bookcases are good because they deflect the bounce of sound. A carpeted floor is ideal. Wall tapestries help. Hard, flat surfaces that bounce sound are bad; textured, irregular surfaces that absorb sound are good. You can eliminate some of the right angles by putting up a couple of those folding screens that people in old movies get behind to change clothes.
Close all the windows and draw all the drapes. Turn off flourescent lights, ceiling fans, and the air conditioner during your recording session. Point the microphone away from the PC and put it as far away from the PC as possible to minimize having the cooling fan noise get into your recording. Unplug the telephone. Disconnect the doorbell. Hang out a "do not disturb" sign and alert your family and neighbors about your project and that you and your dummy need some uninterrupted quiet time. Put out the cat.
Don't close the Recording Control applet just yet.
This procedure opens the Sound Recorder applet shown here.
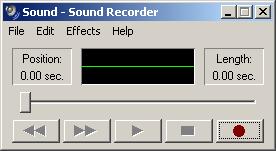
The Sound Recorder applet is capable of recording sound clips of up to one minute in length.
To remove unwanted audio from the beginning of the audio signal:
To remove unwanted audio from the end of the audio signal:
You can make smaller WAV files with lower settings in the record properties, but the audio quality will be unacceptable.
But all is not lost. You can compress the WAV file into a format that virtually all Internet browsers can play back.
To reduce the size of the file, you must compress it into the MP3 format. To do that you need a compression program. One such program is Wav2MP3 available for free download from SourceForge.net. Download and install the Wav2MP3 Installer version. Once you have it installed:
When compression is completed, the compressed MP3 file is located in the same folder as your WAV file. The MP3 file is about 250 kilobytes, which takes about a half minute to download with a typical dialup connection. That's a significant improvement.
The mp3 file can now be uploaded to your website. Send a copy to your webmaster to install.
Here is a demo recording I made by using the procedures in this
document.
Here's your dilemma. You want your demo to sound like you have a gig. You have a web site to help you get gigs but you don't have any gigs yet. None of your performances so far have been in front of a live audience. You could get some family and neighbors in and tell them to laugh at every joke, but here's an idea that involves a bit more effort and technical know-how and that can result in something sounding more professional.
In other words, put in a 90-minute cassette, which records for 45 minutes on each side, turn it on in record mode before you go in, and leave it running until you leave. If you need to flip or change the tape, do it in a stall in the restroom so no one sees you do it. Have a drink and enjoy the show.
Try to sit some distance from other patrons and try not to laugh too loudly yourself.
You'll need audio mixing software for the next several steps. I use Adobe Audition.
You might need to enlist the aid of a nephew who is a techno-geek and who understands the technical parts of audio recording. Everybody has a nephew like that.
The Sound Card
This procedure assumes that your PC runs Windows and has a sound card. Here's what a typical sound card looks like outside the computer.When the sound card is installed the small receptacles, called jacks, are exposed at the back of the PC. One jack is where your speaker cable or headphones are plugged into the sound card. Another jack is for the microphone. The other two jacks are for connecting line level inputs and outputs. We won't need them for this job.
You might have to look closely at the jacks to see how they are labeled. If you have documentation for the sound card, it should tell you which jacks are for which circuits. Some cards have the jacks color coded to match the plugs on an integrated system.
Laptop PCs have internal sound circuits with similar jacks. This procedure works as well with a laptop PC.
The Microphone
The microphone is probably the only thing you need to buy. The one shown here is available at Radio Shack for $9.99. It has thecorrect cable plug to fit the sound card's microphone input jack.
It is best, although not absolutely essential, to use a microphone with an on/off switch like the one shown here.
The more you spend for a microphone, the better your audio sounds. But this recording is of your voice only. The human voice does not have the frequency and dynamic ranges of musical instruments. Therefore, you don't need studio-quality equipment to make a good-sounding recording of a spoken message.
Do not, however, use one of those small PC microphones intended for web communications. Many PCs include one in their audio bundles. Those microphones are for talking to other people on the Internet. They support telephone quality communications only and do not have the dynamic range needed for good spoken audio recordings.
Make sure your microphone has the 1/8" mono plug that fits the sound card's microphone input jack. If it has a 1/4" phone jack instead, you can buy a plug adaptor at Radio Shack.
The Pop Screen
The next piece of equipment can make the difference between a good sounding audio recording and a poor one. When you speak into a microphone from a close position, the plosive B and P labial sounds (yours not your figure's, assuming you use labial substitutions) make a popping sound when the burst of air produced by the labial hits the microphone.
A pop screen device suppresses those noises. You place the screen between your mouth and the microphone and the screen filters the burst of air that the labials produce There are expensive professional studio pop screens as shown here.
Make your own pop screen with a wire coat hangar and an old nylon stocking. Make a round frame from the coat hangar. Rig it with a stand to mount or place on a table in front of the microphone. Stretch two layers of stocking tightly over the frame, one on each side, and stitch or glue the stocking pieces in place. That's all there is to a homemade pop screen, and it's as good as the expensive professional ones.
The Recording Environment - Your Studio
Unless you are willing to move your PC, you are stuck with wherever you have it set up. If the acoustic properties of your computer room are really bad, reconsider packing up the PC and moving it to a better environment.The ideal sound studio is sound proof, which means outside noise can't get in. Sound proofing your bedroom or study might not be practical. Since this is a one-time project, plan to record when background noise is at a minimum. Unless you live in a city, nighttime is the quietest time. If you live near a railroad, learn when the trains go by. If you live next to an interstate or in the departure path at an airport, it's best to take your equipment somewhere else unless you can pick a day when the traffic is at a minimum. (Airplanes take off into the wind, so pick a day when you are downwind of the airport, that is, when the wind is blowing toward your house from the direction of the airport.) Choose a day when it is not raining. Rain on the roof makes a lot of noise.
The ideal sound studio has an irregular room shape, which means that sound doesn't bounce off the walls and ceiling at right angles. The idea is to eliminate natural reverberation, which can compromise the quality of sound. The room should not have a lot of exposed glass surfaces such as sliding glass doors. Lots of books in bookcases are good because they deflect the bounce of sound. A carpeted floor is ideal. Wall tapestries help. Hard, flat surfaces that bounce sound are bad; textured, irregular surfaces that absorb sound are good. You can eliminate some of the right angles by putting up a couple of those folding screens that people in old movies get behind to change clothes.
Close all the windows and draw all the drapes. Turn off flourescent lights, ceiling fans, and the air conditioner during your recording session. Point the microphone away from the PC and put it as far away from the PC as possible to minimize having the cooling fan noise get into your recording. Unplug the telephone. Disconnect the doorbell. Hang out a "do not disturb" sign and alert your family and neighbors about your project and that you and your dummy need some uninterrupted quiet time. Put out the cat.
Preparing to Record on Your PC
- Turn the microphone's on/off switch to the off position.
- Plug your microphone into the sound card's microphone input jack.
- Open the Windows Volume Control applet.
- Click Start on the taskbar
- Click Programs
- Click Accessories
- Click Entertainment
- Click Volume Control
These actions open the Volume Control applet shown here.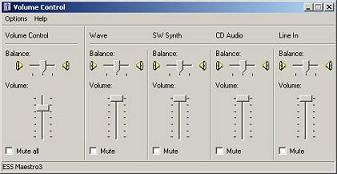
Your Volume Control applet might look somewhat different from mine. But the parts of it we are interested in should be in about the same place. - Click Start on the taskbar
- This step is very important. Click the "Mute all" check box so that it is checked. If you don't do this, you are likely to get feedback through your speakers when you get ready to record.
- On the Options menu, click the Properties command to open the Properties dialog box shown here.
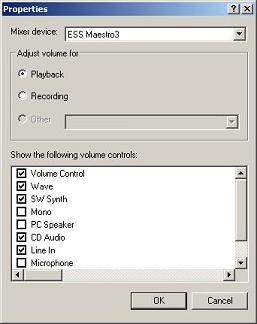
- Click the Recording radio button control so that it is selected.
- Click OK. The Volume Control applet changes to the Recording Control applet as shown here.
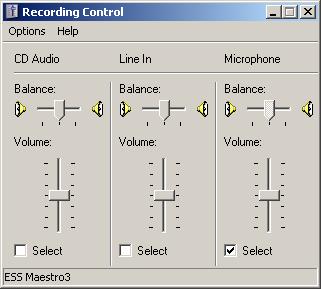
- Click the Select radio button under the Microphone column. This sets you up to record from the microphone.
Don't close the Recording Control applet just yet.
The Windows Sound Recorder
Next you must get the Windows Sound Recorder applet running.- Click Start on the taskbar
- Click Programs
- Click Accessories
- Click Entertainment
- Click Sound Recorder
This procedure opens the Sound Recorder applet shown here.
The Sound Recorder applet is capable of recording sound clips of up to one minute in length.
Recording the Clip
First you must set the recording quality that you want for your clip. Vocal recordings do not need to be stereo and high fidelity. By lowering the settings, you substantially reduce the size of the file you are going to produce.- From the File menu, choose the Properties command. This action opens the "Properties for Sound" dialog shown here.
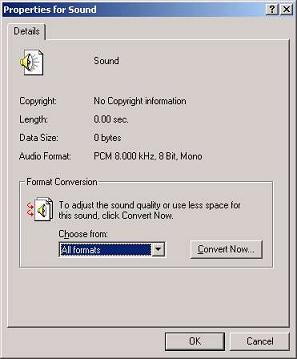
- Click the "Convert Now..." button. This action opens the Sound Selection dialog shown here.
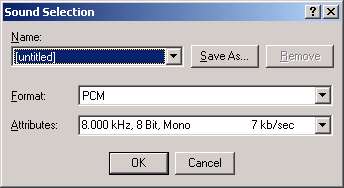
- From the Format dropdown list box, choose PCM. (Note that the Format option includes MPEG Layer 3. This option rarely works because few computers have enough memory to support it.)
- From the Attributes dropdown list box, choose 11,025 kHz,16 Bit, Mono.
(The last two actions produce a smaller WAV file than is usually recorded. They also produce one with lower fidelity, which should not be a problem with vocal-only recordings. If the quality is not acceptable, return here, change the settings, and try again.) - Click OK to close the Sound Selection dialog.
- Click OK to close the Properties for Sound dialog.
- With the Sound Recorder and Recording Control applets open, reopen the Volume Control applet as you did earlier. This is a second copy of the applet. The first copy is now running as the Recording Control applet. You should have all three visible on your desktop like this.

- Ensure that the "Mute all" checkbox is checked on the Volume Control applet.
- Ensure that the Select checkbox under the Microphone column is checked on the Recording Control applet.
- Slide the Microphone column's Volume slider on the Recording Control applet to about the midway position.
- Turn the microphone's on/off switch to the "on" position.
- Hold the microphone four or five inches from your lips. If you have a pop screen, place the screen between your lips and the microphone.
- Click the Record button on the Sound Recorder applet. The record button is the button with a red ball as an icon. You are now recording. The Sound Recorder's slider moves to the right, and the horizontal waveform registers your audio in real time as shown here.
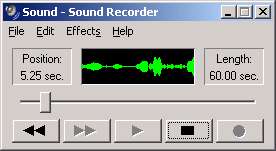
- Speak into the microphone. You have up to one minute to speak.
- Observe the value in the Position display on the Sound Recorder applet. Make sure you complete your recorded speech before it reaches the 60.00 second mark.
- When you are finished speaking, click the Sound Recorder's Stop button. The Stop button is the button just to the left of the Record button. It has a rectangular icon.
Reviewing the Audio Clip
Now that you've recorded a clip, you should listen to it to be sure it sounds right to you before saving it in a file.- Turn the microphone's on/off switch to the off position.
- Uncheck the Mute All checkbox in the Volume Control applet.
- Click the rewind button on the Sound Recorder applet. The Rewind button is the one with the two left-facing arrows.
- Click the Play button to listen to the audio clip. The Play button is the one with the right-facing arrow.
Editing the Audio Clip
You can remove unneeded parts of the signal from the beginning and end of the waveform. Perhaps there is silence (or background noise only) at the beginning of the waveform that was recorded after you clicked the Record button and before you started speaking. Perhaps there is other unwanted audio at the end.To remove unwanted audio from the beginning of the audio signal:
- Listen to the clip and watch the Sound Recorder's Position indicator as you do.
- Note the Position seconds setting where the unwanted audio ends.
- Click the Stop button to stop playback. The Stop button is the one with the rectangle icon.
- Use the mouse to move the slider control to a position where you want to truncate the audio.
- From the Edit menu, choose the Delete Before Current Position command.
To remove unwanted audio from the end of the audio signal:
- Listen to the clip and watch the Sound Recorder's Position indicator as you do.
- Note the Position seconds setting where the unwanted audio begins.
- Click the Stop button to stop playback.
- Move the slider control to a position where you want to truncate the audio.
- From the Edit menu, choose the Delete After Current Position command.
Saving the Audio Clip to a WAV File
Now you must save the audio clip to a file with the filename extension .wav.- From the File Menu choose the Save command. This action opens the Save As dialog shown here.
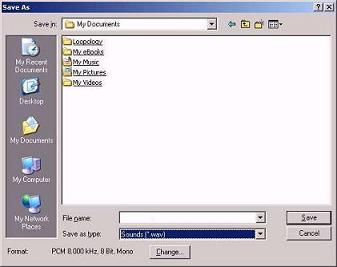
- Navigate to the location on your hard disk where you want to store the wav file.
- Type a name into the File name edit box.
- Click the Save button.
Compressing the WAV file to an MP3 File
The WAV file of one minute occupies 1.26 megabytes of hard disk space assuming you used the recommended settings to record it. It takes more than three minutes to download a file of that size on typical dialup connections. Readers of your website might not be willing to wait that long.You can make smaller WAV files with lower settings in the record properties, but the audio quality will be unacceptable.
But all is not lost. You can compress the WAV file into a format that virtually all Internet browsers can play back.
To reduce the size of the file, you must compress it into the MP3 format. To do that you need a compression program. One such program is Wav2MP3 available for free download from SourceForge.net. Download and install the Wav2MP3 Installer version. Once you have it installed:
- Run the installed Wav2MP3 program.
(You might see several dialogs asking you to install an Easy CD Creator cd. Cancel these dialogs.) - The Wav2MP3 program opens like this.
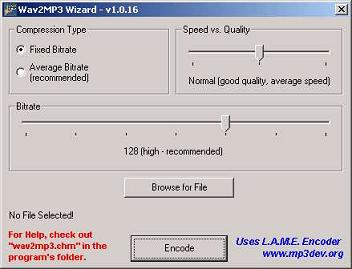
- Slide the Speed vs. Quality slider all the way to the left.
- Slide the Bitrate slider all the way to the left.
(The last two actions produce the smallest possible MP3 file. They also produce one with the lowest possible fidelity, which should not be a problem with vocal-only recordings. If the quality is not acceptable after compression, return here, change the slider settings, and try again.) - Click the Browse for File button to choose your WAV file to compress. This action opens a standard Windows File Open dialog from which you can select your file. The file name is displayed in the Wav2MP3 application window.
- Click the Encode button to begin encoding the MP3 file.
When compression is completed, the compressed MP3 file is located in the same folder as your WAV file. The MP3 file is about 250 kilobytes, which takes about a half minute to download with a typical dialup connection. That's a significant improvement.
The mp3 file can now be uploaded to your website. Send a copy to your webmaster to install.
Here is a demo recording I made by using the procedures in this
document.
But What About the Laughter?
Your demo audio clip is supposed to be a comedy dialog, but, like the example clip here, there is no laughter because you recorded it at home. What if you want to add a laugh track?Here's your dilemma. You want your demo to sound like you have a gig. You have a web site to help you get gigs but you don't have any gigs yet. None of your performances so far have been in front of a live audience. You could get some family and neighbors in and tell them to laugh at every joke, but here's an idea that involves a bit more effort and technical know-how and that can result in something sounding more professional.
- Visit a local comedy club. Carry a concealed portable tape recorder and lapel microphone. You must have this stuff concealed or they'll make you leave. They'll think you are there to steal jokes.
- Record the performances of some funny comics. You aren't interested in what they say; you want to capture the laughter.
- Record the applause at the end of each performance.
- Record several minutes of crowd noises when no one is performing.
In other words, put in a 90-minute cassette, which records for 45 minutes on each side, turn it on in record mode before you go in, and leave it running until you leave. If you need to flip or change the tape, do it in a stall in the restroom so no one sees you do it. Have a drink and enjoy the show.
Try to sit some distance from other patrons and try not to laugh too loudly yourself.
You'll need audio mixing software for the next several steps. I use Adobe Audition.
You might need to enlist the aid of a nephew who is a techno-geek and who understands the technical parts of audio recording. Everybody has a nephew like that.
- Record selected portions of your tape into WAV files on your hard drive.
- Mix the background crowd noises with your demo audio track. This makes it sound like you are recording in a night club.
- Mix laughter clips in after every joke. You should have recorded your demo with pauses for the laughter.
- Mix an applause clip in at the end of the demo.
posted by Al Stevens | 9:21 AM
![]()
![]()
0 Comments:
Post a Comment
Subscribe to Post Comments [Atom]
<< Home